I've had the pleasure (I can finally say that now) of migrating a decent sized environment from VMware ESXi/vCenter to Hyper-V/SCVMM over the past few months. It is still in progress but the bulk of the "hard work" is done at this point and the light at the end of the tunnel is getting brighter. The migration was much more than just switching hypervisors and management platforms. It has consisted of redesigning our entire multi-tenant hosting platform while switching out almost every backend piece of supporting infrastructure and doing it in a "swing migration" style to keep costs relatively low.
It has been quite a ride to say the least... and by ride I mean something along the lines of what I imagine riding a turbocharged unicycle off-road, down the side of an erupting volcano while trying not to crash or get burned would be like. Not sure where exactly that came from as I have never been on a unicycle nor have I been chased by lava, but hopefully you get the idea. It wasn't easy, full of obstacles, and time was not exactly on my side. I ran into numerous roadblocks along the way but overall the journey has been totally worth it (so far). I want to share my experience and also try to help others who may be encountering the same issues I had, or better yet, prevent them from going through the pain by avoid mistakes. Someone new to Hyper-V may not have nearly the trouble I had switching my mindset from the VMware world to the Microsoft world. But if you are like me and have lived in VMware for the past 7 years or so, "logical networks" and "logical switches" may not seem so logical at first.
My role and overall experience with virtualization and its supporting technologies put me in the unique position of allowing me to handle this project in its entirety from initial design through post production. It is still a work in progress and admittedly the initial design has changed a few times at this point, but ultimately the goal has remained constant: design/build/implement a hosting platform that is easy to consume for tenants, easy to support/grow for our service team, easy to pitch as a vision for our account managers, easy to sell for our sales team, and of course, decrease costs and complexity while increasing profitability, reliability, scalability, supportability, and expanding the feature set. Simple, right?
I'm still putting together the bullet points for this and trying to keep it from being a long ramble or collection of random thoughts that no one really cares about. Personally, I would have been lost without the help of bloggers, youtubers and forum posters. TechNet alone only gives part of the big picture. Training and certification courses are another small piece. Previous experience actually made some of it more confusing than it needed to be. I want to give back to the community. I hope to be able to contribute some bits of experience to help bring it all together for others. If nothing else, it will help me reinforce the concepts for myself!
If there is anything you would like to specifically discuss, always feel free to leave a comment or find me on LinkedIn or Twitter (@johnyarbi) and send me a message. I may not have the answer, but I try to reply to everything and may be able to point you in the right direction. Looking forward to hearing from you!
Tuesday, December 1, 2015
Sunday, February 15, 2015
Acronis restore error code 0x590001
I can remember a time when every server I dealt with was physical. Back when I physically had to get up from my desk, physically travel to a clients site, physically attach their backup storage to their crashed physical server, put a physical disc in the physical drive and use a physical keyboard and mouse to start the recovery. Even with all that physical activity I was still overweight... but I digress... Then, if the sun/moon/stars aligned, the driver gods were being nice, and my caffeine levels stayed steady, there was a good chance I might be able to have the client back up and functional by the time they came in to open the next day. Ah the memories...
Thankfully, those days are long gone for me. Now most of what I deal with is virtual. Remote connectivity, VMware/Hyper-V, iLO/iDRAC access to the hardware console, ISO media, SAN storage, NAS backups... I don't even have to be at my physical office to do any of it. I can't count how many times I have done work while out with friends via an RDP client on my iPhone. Love this technology driven world when it all works! There are still times, though, when those physical things that run the virtual world I live in need attention.
I've been working on spinning up a small Hyper-V cluster on a few older HP ProLiant DL360 G7 servers. I took one of the servers, installed Windows Server 2012 R2, ran the gauntlet of updates to get it current, performed some tweaks, installed all the HP integrations, etc. In the end, I had a server ready to be imaged/sysprep'ed and used as my base template for spinning up the other two servers. Hardware was the same across all three so a simple image based backup/restore using Acronis seemed like the way to go. Acronis is my trusty dusty for stuff like this. P2V conversions, hardware replacement without reinstalling anything, anything to do with recovery, it is my go to tool because it just works... usually.
This case seemed pretty straightforward. Took the image from the source server using the bootable ISO and stored it to a NAS. Used the same ISO on the first clone to start the restore process, deleted the original volumes, selected the MBR and all the volumes (just the OS and system reserved), and started the restore. *yawn*
At 95% I see an error... code 0x590001. *grrr* Actually a few errors:

A quick search through the world of webs revealed a lot of suggestions for running a chkdsk but no one ever came back and said "wow that fixed it!" Those posts usually ended with "reinstalled and went from there :'(". Pfft... this is all a fresh build, no errors in the event logs, no problems up to this point... ain't nobody got time for that!
My source image must have been bad. Great, I guess I didn't validate the integrity of the source image. Repeated the process making sure I enabled validation... clean backup, same error on restore. New media, new backup target, sector by sector backup, same problem. Hm... Oh! I rebuilt the RAID array, I probably didn't set the logical disk as bootable. Fixed that, still failed. Oh! I found the original disk was provisioned as GPT instead of MBR. Man I'm getting rusty... converted to MBR... still failed. Tested restoring the individual pieces, first the MBR... fail. Second, the data volumes... success.....? Ok..... so it's just the MBR restore that's failing. Hm... I can probably fix that manually! Rebooted with the Windows 2012 R2 media in and ran a repair... viola! Windows boots.
At this point I'm still not sure why Acronis is having trouble restoring the MBR. The only thing I can think is when I built the new logical disk in the RAID array, I did not actually initialize it. I may go back and try that and see if my results are any different. For this lab build out, though, I'm simply going to restore the data volumes and then run a repair. Stupid physical machines. Moving on...
Thankfully, those days are long gone for me. Now most of what I deal with is virtual. Remote connectivity, VMware/Hyper-V, iLO/iDRAC access to the hardware console, ISO media, SAN storage, NAS backups... I don't even have to be at my physical office to do any of it. I can't count how many times I have done work while out with friends via an RDP client on my iPhone. Love this technology driven world when it all works! There are still times, though, when those physical things that run the virtual world I live in need attention.
I've been working on spinning up a small Hyper-V cluster on a few older HP ProLiant DL360 G7 servers. I took one of the servers, installed Windows Server 2012 R2, ran the gauntlet of updates to get it current, performed some tweaks, installed all the HP integrations, etc. In the end, I had a server ready to be imaged/sysprep'ed and used as my base template for spinning up the other two servers. Hardware was the same across all three so a simple image based backup/restore using Acronis seemed like the way to go. Acronis is my trusty dusty for stuff like this. P2V conversions, hardware replacement without reinstalling anything, anything to do with recovery, it is my go to tool because it just works... usually.
This case seemed pretty straightforward. Took the image from the source server using the bootable ISO and stored it to a NAS. Used the same ISO on the first clone to start the restore process, deleted the original volumes, selected the MBR and all the volumes (just the OS and system reserved), and started the restore. *yawn*
At 95% I see an error... code 0x590001. *grrr* Actually a few errors:
- Error code 5,832,705 (0x590001), module 89
- Error code 1, module 89, message: Direct R/W operation has failed
- Error code 65521, module 0, message: Input/output error
A quick search through the world of webs revealed a lot of suggestions for running a chkdsk but no one ever came back and said "wow that fixed it!" Those posts usually ended with "reinstalled and went from there :'(". Pfft... this is all a fresh build, no errors in the event logs, no problems up to this point... ain't nobody got time for that!
My source image must have been bad. Great, I guess I didn't validate the integrity of the source image. Repeated the process making sure I enabled validation... clean backup, same error on restore. New media, new backup target, sector by sector backup, same problem. Hm... Oh! I rebuilt the RAID array, I probably didn't set the logical disk as bootable. Fixed that, still failed. Oh! I found the original disk was provisioned as GPT instead of MBR. Man I'm getting rusty... converted to MBR... still failed. Tested restoring the individual pieces, first the MBR... fail. Second, the data volumes... success.....? Ok..... so it's just the MBR restore that's failing. Hm... I can probably fix that manually! Rebooted with the Windows 2012 R2 media in and ran a repair... viola! Windows boots.
At this point I'm still not sure why Acronis is having trouble restoring the MBR. The only thing I can think is when I built the new logical disk in the RAID array, I did not actually initialize it. I may go back and try that and see if my results are any different. For this lab build out, though, I'm simply going to restore the data volumes and then run a repair. Stupid physical machines. Moving on...
Thursday, March 14, 2013
Domain Controller rebooting into DSRM and no password?
I recently ran into a client whose Domain Controller (was Windows SBS 2011) somehow got stuck in a state where after a reboot it would only go into Directory Services Restore Mode (DSRM). Normally, I would just log in with the DSRM password, run MSConfig and uncheck the safeboot option responsible for this and reboot. However, in this case, we did not have the correct DSRM password documented so I could not get to MSConfig or a command prompt.
I vaguely recall being able to use a boot ISO to reset the password for DSRM (which is essentially just a hidden local Administrator on a Domain Controller) but for whatever reason I could not get that to work this time. Maybe I just didn't try hard enough, or maybe my memory isn't what it used to be and it is just not possible, but I gave up on this and tried something else.
My next thought was, since this was a VM, to open the VMDK with another virtual machine and just edit the BOOT.INI file. Showing my age here, but BOOT.INI files are old school. I had totally forgotten about the Boot Configuration Data Store replacing BOOT.INI in 2008 and up. Wasn't even sure if this would work to begin with but it was now clear it wasn't even an option.
Realizing BCD was in play, however, led me to bcdedit, which I remembered was available from the Windows 2008 R2 installation media's repair console. In the past I had used it to repair servers that would not boot at all for various reasons, but this time I would use it to clear the safeboot parameter. So I loaded the ISO into the virtual DVD drive, booted into the repair console, and ran:
bcdedit /deletevalue {default} safeboot
Made sure the command was successful and rebooted. Viola! The server came up in normal mode and we immediately reset the DSRM password to what we had documented.
Hopefully this saves someone somewhere some time.
UPDATE: I just had the same server reboot into the DSRM loop again. This time, we actually had the password so fixing it with MSConfig was possible. While in that utility I noticed an option to make the changes permanent so I checked that, applied the setting and confirmed I wanted to make the change. Hopefully this will make sure the loop does not happen again.
Tuesday, November 27, 2012
EMC ~management storage group problems
I was recently working with a client that had an EMC CX4-120 and we were trying to setup a Cisco UCS blade cluster to boot from iSCSI on it. Another vendor was doing the UCS portion so I was tasked with getting the EMC side setup. Through Unisphere I had to go in and manually create the hosts and register their IQN's. Next I created the LUN's and the storage groups. When assigning the LUN's to the storage group, make sure that the "Host LUN ID" field gets changed if the initiator will eventually be in multiple groups where LUN ID 0 is already taken. So in the end, each blade had a storage group that was mapped to a LUN with a unique LUN ID to be used for iSCSI booting ESXi.
Great, but the hosts would not connect.
We kept getting a warning "EV_TargetMapEntry::UpdateTargetMapEntry - different ports" and an information message saying iSCSI login failure. I went ahead and opened up a case with EMC support because from what I could tell the configuration looked correct at this point. We weren't really getting anywhere until after some clicking around I noticed the ~management storage group showed all the blades in it and so did the individual storage groups created for the blades. I recalled a previous experience similar to this where we had to get the hosts out of the ~management group. Simply removing them from that group doesn't work. I ended up having to remove them from their individual groups, apply the settings, then re-add them to the individual groups to get them to disappear from the ~management group. Once that was done, the blades were able to see their respective LUN's and life was good.
A couple of notes:
* Re-registering the hosts manually seems to have caused them to go back to the ~management group.
* I'm not positive is the Host LUN ID is able to stay 0 or not, but I did not want to risk a LUN ID conflict since production data was on a LUN that already had ID 0 for another storage group (one that the blades will eventually belong to).
* If you are using Active/Failover when registering a host connection, the UCS blades will show one success and one failure if setup correctly (at least what I think is correctly!).
* To deregister certain things required being in Engineer mode. To get into that mode from Unisphere, press Ctrl+Shift+F12 and type in the password. Appears to be either "SIR" or "messner" depending on how old your firmware is. Don't use this mode unless you are on the phone with support and absolutely sure you know what you are doing.
Sorry if I am missing some details, just wanted to do a brain dump while it was still semi-fresh.
Monday, August 27, 2012
NetApp disk reallocation - not all that scary
I recently had the experience of restructuring aggregates on a production NetApp FAS2050 cluster due to some incorrect initial tray structuring. Any time I work with production data there is always an uneasy feeling, but after some research I felt pretty confident. Here is an overview of why I had to do this and what steps are involved.
The original design had (essentially) split a few trays down the middle and assigned half the disks to each head to attempt to balance a semi-random VMware load. We quickly realized that the bottleneck would not be head resource (CPU/memory/HBA) contention but instead contention from the number of disk spindles. Six active spindles (actually 4 after RAID_DP makes parity disks) doesn't allow for much load, especially in a SATA tray.
To remedy this specific case, we decided it would make more sense to assign a tray per head instead of half a tray per head. Controller A would get the SATA tray and controller B would get the 15K fibre channel tray, and any future trays would try to match up so that we can build larger aggregates. The goal was to take the 6 SATA disk aggregate plus the hot spare from controller B and reassign those disks to controller A, bring them into controller A's SATA aggregate, and be left with a 12 disk aggregate and 2 hot spares. All without losing any data of course. Then perform the same steps to assign the FC disk tray to controller B.
So, there is not magic way to combine the aggregates that I know of without first evacuating the contents of one. Luckily in this case, we had enough extra storage that we were able to perform Storage vMotion's and easily get the aggregate empty. If you do not have the extra space just laying around or you do not have Storage vMotion then you may not be able to proceed. Depending on the capacity in question and the I/O load, there are some pretty cheap ways to get a decently solid device like a ReadyNAS that could be used temporarily as an NFS datastore. Maybe be resourceful and get a 30 day trial ReadyNAS, use a trial license for VMware so you get the Enterprise Plus feature set which includes Storage vMotion... or setup Veeam Backup and Replication in trial mode so you can replicate, then failover and failback when you are done. Just thinking out loud here :)
Anyway, once the LUN/export/volume/aggregate is completely evacuated, you are ready to start destroying things! Actually, I recommend doing this in phases if you have time. First and foremost, ensure that your backups are rock solid. Next, if you have a LUN, take it offline. If you have an export or a directly accessed volume, take it offline. This helps you make sure that a) you have the right object and aren't going to ruin your life because something was labeled wrong and b) nothing breaks unexpectedly. It is very easy to bring it back online and fix the problem. Not so easy to "undestroy" an aggregate, although it looks like it can be done.
Before you proceed, I recommend taking note of what disks you are actually wanting to migrate so that when you start reassigning disk ownership you get the correct ones. Do this by typing:
disk show
and looking for any disks owned the original controller and in the aggregate. Also make note of any current spares that you want to reassign. Ensure that you get the whole disk identifier such as 1d.29 since there may be multiple disk 29's.
Once you are confident the aggregate is offline, no data is missing, and nothing is broken, now you can proceed with aggregate destruction. If you have the NetApp System Manager, right click the offline aggregate and click Delete. Otherwise from the console of the controller that owns the target aggregate, type:
aggr status
Confirm you see it offline, then take a deep breath and type:
aggr destroy <your_aggr_name>
You will be prompted and forced to confirm that are about to destroy all the data on the aggregate and that you want to proceed. If you are comfortable with this and confident that you are deleting the correct, empty aggregate, proceed by either clicking the appropriate buttons or typing yes. If you are not, then stop and call someone for a second opinion, then repeat. If you delete the wrong one somehow, get NetApp on the phone immediately and hope that your backups restore if needed. I take NO responsibility for your choices, sorry :)
So at this point, your aggregate should be gone and the disks that were assigned to the aggregate should now be marked as spare drives. Confirm this from the console by typing:
disk show
You should see all the drives noted earlier marked as spare and still owned by the original controller. At this point I recommend waiting again if you have time. Once you proceed from this point the chances of recovering data from your destroyed aggregate are pretty much gone. Reassigning disk ownership shouldn't do it, but once you add disks to the aggregate they will be zeroed and undestroy will no longer work. Paranoid, yes. Employed, yes :)
To reassign the disks to the other controller, login to the console of the controller that still owns the "new" spare disks and do the following:
Reference: https://communities.netapp.com/docs/DOC-5030
Turn off disk auto assign:
options disk.auto_assign off
Remove ownership from the disks you want to move by issuing the following command:
disk assign -s unowned disk.id1 [disk.id2 disk.id3 ...]
Now, go to the other controller (the one you want to claim ownership of the disks with) and make sure it sees the disks as not owned:
disk show -n
The disks should be listed as "Not Owned". You can now assign the disks to the destination by typing one of the following commands (from the head you want to grant ownership to):
If you want to assign all unowned/unassigned disks to this controller:
disk assign all
If you only want to assign the ones we are working with:
disk assign disk.id1 [disk.id2 disk.id3 ...]
If you have made it this far and not ran into anything unexpected then great. However, here is the first step where data will actually become unrecoverable. If I'm not mistaken, all the previous steps left the bits in tact. This step will actually zero the newly added disks. Ready? Let's go!
Side track for a moment: In this case, we were going to a 12 disk aggregate with 2 hot spares. If you are going larger than that, there are specific guidelines set forth by NetApp about RAID group sizes and structure. Please reference the following article before allocating your disks if you are dealing with more than 12 or think you will eventually be adding a tray that would give you less than 12 and would want to add them to the same aggregate: https://communities.netapp.com/thread/1587 There are a lot of considerations so think this through such as firmware version, SATA vs SAS vs FC, future plans, etc. I wish I could go into detail, but the previously mentioned thread covers most of the details. Specifically note the mini articles posted by the NetApp employees pretty far down into it. Also, here is a great write-up from the NetApp Community forum that deals with the aggregate structure and the next steps: https://communities.netapp.com/people/dgshuenetapp/blog/2011/12/19/my-first-experience-adding-disks-and-reallocation
Anyway, back to building our little 12 disk aggregate:
aggr add aggr_name -g raid_group -d disk.id1 [disk.id2 disk.id3 ...]
Note that the raid_group mentioned is the RAID group that you will add these disks to. For small aggregates (sub 14) there is typically a RAID group called rg0. To find out which RAID group, you will need to type:
aggr status -v
This should display something that shows "/aggr_name/plex#/rg_name". Make note of the RAID group name.
Now...... you wait. If you look at the status of the aggregate it will say growing. If you look at the status of the disks they will say zeroing. If you look at the CPU on the filer it will be higher than normal. If you look at your watch, it will say wait :) Do a couple of sanity checks to make sure things look good still and then go get some coffee. Looking back at our case, the disks took about 4 hours to initialize according to the syslog. Once they are done, they will show up in the aggregate as available space.
Now the fun part, actually reclaiming the space and increasing your volume size. Since our case was backend storage for a VMware environment (VMFS, not NFS) we needed to increase the volume size and increase the LUN size, then increase the VMFS volume. Since vSphere 5.0 and VMFS 5 support up to 64TB datastores now in a single LUN, we could have created one large volume and one large LUN. We opted to keep things in less than 2TB volumes though due to some point of no return limitations with deduplication outlined here: https://communities.netapp.com/thread/4360. (Update: I actually tried to create a >2TB LUN and it wouldn't let me. I guess our FAS2050 doesn't know about VMFS5.)
Do increase the sizes, I've found that NetApp System Manager makes life much simpler. However, for command line reference, to increase the size of the volume:
vol size /vol/name +###GB
As I said, this was a lot easier through System Manager so I used that.
For the LUN commands reference http://www.wafl.co.uk/lun/. To increase the size of the LUN via command line:
lun resize /vol/name/lun_name absolute_size
Again, System Manager made this much easier.
Go back into the command line and re-enable the disk auto_assign:
options disk.auto_assign on
Before you put additional load on the larger aggregate, I recommend running an reallocate so that the blocks will be optimized across the new disks. See the previously mentioned article: https://communities.netapp.com/people/dgshuenetapp/blog/2011/12/19/my-first-experience-adding-disks-and-reallocation. If you do not perform this, your disks may grandually start to balance out, but you are not going to see the full benefits of having the new spindles without it. A couple quick notes: it does require free space in the volume to run (10-20% I believe), it does take a while (ours took approximately 26 hours), and it does cause high CPU and disk activity. The performance increase was pretty significant though so I highly recommend learning more about reallocate and how/when to use it. I will try to write a follow up article that talks a little more about this process and what to expect while it runs.
So you know have a larger aggregate, larger volume, and larger LUN. Now, in VMware, grow the datastore. Go to the datastore that is backed by this aggregate/volume/LUN and go to the properties of it. You should be able to increase the disk. Here is a VMware KB for the steps involved with that: http://kb.vmware.com/selfservice/microsites/search.do?language=en_US&cmd=displayKC&externalId=1017662. This should just allow you to grow the VMFS volume without having to create any extents or splice things together.
That should do it! You should now have more spindles and more capacity. Win win! Let me know if you find any problems with the outlined info above or if you had any success with it.
Friday, June 8, 2012
NTFS event ID 55 after disk extend on Server 2008
This isn't the first time I've ran into this, but hopefully it will be the last. The first time was with a volume containing SQL data. This time it was one with Exchange mailbox stores. A little bit of thought upfront will go a long way in preventing this so hopefully the following helps. (Chances are though, if you are reading this, you probably searched Google after it was already done, but hopefully it still helps and keeps you from jumping off the cliff!)
My Scenario: An SBS 2008 server was running low on space. It was running as a VM inside vSphere with the appropriate the licenses to grow disks without downtime. It was 2:30AM on a Thursday and I was just trying to knock an item off my to do list before bed.
My Typical Steps: I increased the disk size on the VM, then went into Windows, Disk Management, rescan disks, right clicked the volume and selected Extend. Since it was 2008 (non R2), there is a bug that seems to set the size 1MB larger than possible, so adjust it down and then back up (if you have ever done it, you will know what I'm referring to) and finished.
The Problem: After running the extend, I got an error message saying "Invalid parameter". In Disk Management, the volume appeared to be resized. However, I noticed that in Windows Explorer, the drive was not showing the additional space.
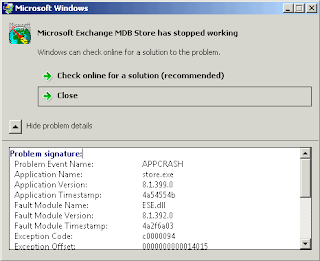
What I Did Next (not quite right): In the past when I have seen that, I found that running "diskpart", selecting the appropriate volume, then running "extend filesystem" typically fixes Explorer. I tried it and received an error (wish I would have done a screen capture on it) but it also said the command was successful. Explorer still didn't show the free space, and then I noticed a Windows error reporting window stating that "store.exe" crashed:
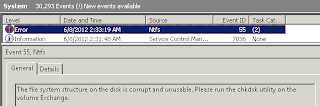
I checked Event Viewer and found NTFS event ID 55's:
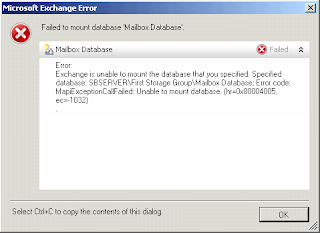
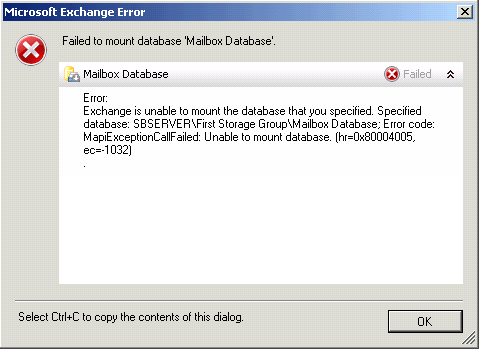
Since this was the Exchange volume, I then went into Exchange Management Console and noticed the mailbox store was down and when I tried to mount it I received an error:
Now panic sets in. Corrupt disk/volume, database that will not mount, it was 3AM and I was fighting something that should have been point, click, done. Backups are good, but this server is several hundreds of GB so a restore would take way to long and potentially lose hours of data.
What I Did Next (better): Since it is a VM on VMware, I had the luxury of creating a quiesced snapshot before proceeding so I did that. Next, I stopped all services that might be interacting with the volume in question. In this case, it was Exchange only so I stopped those services (and the Microsoft Search service). Next, I dropped to a command line and ran chkdsk (no /F yet) on the drive. It found an error:
Attribute record (128, "") from file record segment 6)
Did a little research on this and it looked like doomsday based on what I read. Most people said they had to format.
Since I had my snapshot (and backups as worst case), I went ahead and tried running "chkdsk E: /F", allowed it to dismount the volume, and it ran through and said it fixed the problem. I was then able to restart all the services and the mailbox store mounted! Mailboxes were available and mail started flowing again. Yay!
Hindsight: I might have just been able to restart the Information Store service but that wouldn't have fixed the NTFS corruption. After the first time we went through this, our team documented a pretty failsafe procedure for extending disks like this on Windows Server 2008 and up that I failed to follow. (Windows 2003 is a different beast but can be similar using diskpart and/or a tool called ExtPart.exe (32-bit only) if you need to extend a critical volume.) Basically, for 2008 and up, we have found that the following seems to work well: extend the disk in VMware, fresh reboot, stop the appropriate services in the guest, take a snapshot with VMware, then try to extend the disk using diskpart extend, then diskpart extend filesystem. So far, we have never had an issue doing it that way. I decided to be a bit of a renegade because of lack of sleep and I have had such good luck lately extending disks in 2008 R2 on the fly through the GUI that I didn't feel the need to abide by the safe method. Err... I mean... I just needed something good to write about so I decided to do this on purpose... yeah...
No more renegade warrior for me, at least, not tonight :) Special thanks to JK for somehow sensing I was in trouble, waking up and replying to an email, and being a calm voice with several good ideas (and for not rubbing it in my face that I didn't follow the safe method).
Note: This really only seems to be an issue on 2008 (non R2) that I have seen.
My Scenario: An SBS 2008 server was running low on space. It was running as a VM inside vSphere with the appropriate the licenses to grow disks without downtime. It was 2:30AM on a Thursday and I was just trying to knock an item off my to do list before bed.
My Typical Steps: I increased the disk size on the VM, then went into Windows, Disk Management, rescan disks, right clicked the volume and selected Extend. Since it was 2008 (non R2), there is a bug that seems to set the size 1MB larger than possible, so adjust it down and then back up (if you have ever done it, you will know what I'm referring to) and finished.
The Problem: After running the extend, I got an error message saying "Invalid parameter". In Disk Management, the volume appeared to be resized. However, I noticed that in Windows Explorer, the drive was not showing the additional space.
What I Did Next (not quite right): In the past when I have seen that, I found that running "diskpart", selecting the appropriate volume, then running "extend filesystem" typically fixes Explorer. I tried it and received an error (wish I would have done a screen capture on it) but it also said the command was successful. Explorer still didn't show the free space, and then I noticed a Windows error reporting window stating that "store.exe" crashed:

I checked Event Viewer and found NTFS event ID 55's:

Since this was the Exchange volume, I then went into Exchange Management Console and noticed the mailbox store was down and when I tried to mount it I received an error:
Now panic sets in. Corrupt disk/volume, database that will not mount, it was 3AM and I was fighting something that should have been point, click, done. Backups are good, but this server is several hundreds of GB so a restore would take way to long and potentially lose hours of data.
What I Did Next (better): Since it is a VM on VMware, I had the luxury of creating a quiesced snapshot before proceeding so I did that. Next, I stopped all services that might be interacting with the volume in question. In this case, it was Exchange only so I stopped those services (and the Microsoft Search service). Next, I dropped to a command line and ran chkdsk (no /F yet) on the drive. It found an error:
Attribute record (128, "") from file record segment 6)
Did a little research on this and it looked like doomsday based on what I read. Most people said they had to format.
Since I had my snapshot (and backups as worst case), I went ahead and tried running "chkdsk E: /F", allowed it to dismount the volume, and it ran through and said it fixed the problem. I was then able to restart all the services and the mailbox store mounted! Mailboxes were available and mail started flowing again. Yay!
Hindsight: I might have just been able to restart the Information Store service but that wouldn't have fixed the NTFS corruption. After the first time we went through this, our team documented a pretty failsafe procedure for extending disks like this on Windows Server 2008 and up that I failed to follow. (Windows 2003 is a different beast but can be similar using diskpart and/or a tool called ExtPart.exe (32-bit only) if you need to extend a critical volume.) Basically, for 2008 and up, we have found that the following seems to work well: extend the disk in VMware, fresh reboot, stop the appropriate services in the guest, take a snapshot with VMware, then try to extend the disk using diskpart extend, then diskpart extend filesystem. So far, we have never had an issue doing it that way. I decided to be a bit of a renegade because of lack of sleep and I have had such good luck lately extending disks in 2008 R2 on the fly through the GUI that I didn't feel the need to abide by the safe method. Err... I mean... I just needed something good to write about so I decided to do this on purpose... yeah...
No more renegade warrior for me, at least, not tonight :) Special thanks to JK for somehow sensing I was in trouble, waking up and replying to an email, and being a calm voice with several good ideas (and for not rubbing it in my face that I didn't follow the safe method).
Note: This really only seems to be an issue on 2008 (non R2) that I have seen.
Monday, November 7, 2011
VCAP-DCA: The wait is over...
Finally, after 17 days of anxious anticipation, the exam results are in... and... wait for it... I PASSED!!! w00t w00t! I needed a 300 to pass and I scored 358 out of 500. Not the best score in the world but considering I decided to just "try it" and only gave myself two weeks to study, I couldn't be happier! Now, if they would just hurry up and send my ID so I know what number I am...
Update: Number 474!
Update: Number 474!
Subscribe to:
Posts (Atom)